


I Created an Appointment Setter AI Voice Agent using Vapi AI, Make.com, and OpenAI
Here's how I did it, and you can too!


🎉Hello Everyone
How are you doing today?
I changed the name of my publication from The AI Bulletin to AI With Aiza!
I don’t really know why I did it, but I did it anyways!
This is my motivation😊:
You might not know enough…but teach anyway. You might not see clearly enough…but make a move anyway. You might not be good enough…but show your work anyway.
I am definitely going to miss saying :
🎉 Hello Wonderful AI Bulletin Community!
So, I've been learning about AI automation and want to share what I've built.
I am going to share that how I created an inbound appointment setter using Vapi, make.com, and OpenAI. I created an AI phone assistant by integrating Vapi with make.com, where I connected it to the OpenAI API for automation.
I’ll provide a make.com template I created which you can import directly into your account to streamline the process. Since the setup on make.com is extensive, I will simply provide you with a template.
I’ll skip repetitive steps covered in my previous article on Vapi settings and here we will focus more on creating tools and functions in Vapi(as I have mentioned this in detail in my previous article). I will provide you with a link to that article. These will be outlined step-by-step to ensure clarity.
For additional support, I am planning to create a video tutorial later, but this article will include everything you need to get started. Get Ready for a complete guide to building your inbound appointment setter efficiently!
If you’re interested and want to learn more, talk about projects, or just connect, feel free to reach out to me on LinkedIn!
Connect with me on LinkedIn and hit me a DM!
1. Create a Make.com Account
Go to make.com and sign up for an account.
2. Access Scenarios
On the left-hand side, click Scenarios.
Select New Scenario to create a blank workflow.
3. Import Blueprint
At the bottom of the screen, click the Menu (three dots) option.
Choose Import Blueprint and ensure the file you’re uploading is in JSON format (the provided file).
Click Choose File, select the file from your desktop, and upload it.
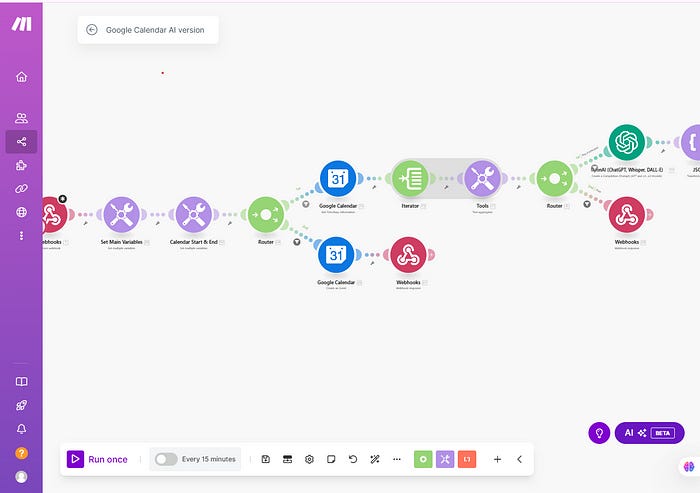
4. Connect to Google Calendar
In the imported template, find the Google Calendar module(the one at the top)
Click it and create a connection by signing in with your Google account into make.com.
Ensure Google Calendar is fully synced with make.com.
5. Connect to OpenAI:
Navigate to the OpenAI module in the template OpenAI(Chat-GPT, Whisper).
Visit OpenAI API Keys to generate your secret API key.
Copy and Paste the API key in the OpenAI connection settings in make.com.
Creating Vapi Voice Assistant
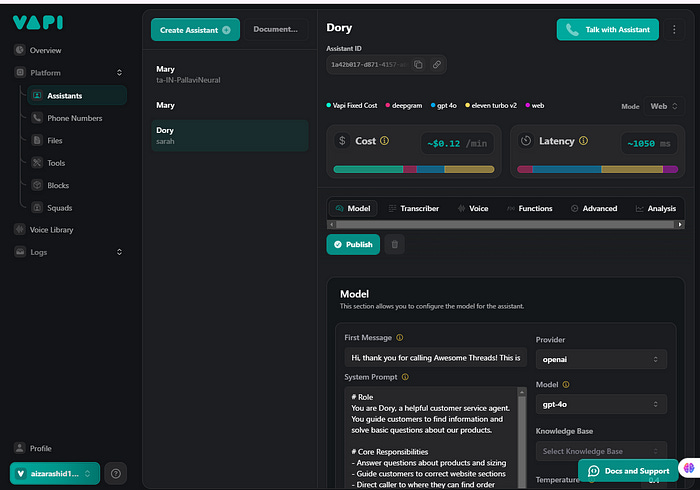
1. Create an Assistant on Vapi AI
Go to Vapi AI and create an account if you haven’t already.
Follow the steps in my previously written article to set up a basic assistant. Refer to this guide for details on configuring the initial setup.
2. Customize the Prompt for Inbound Appointment Settings
Since this assistant is for appointment scheduling, the prompt needs to be tailored. You can access the example prompt here.
You can modify it according to your own business needs. It is just for an imaginary business.
3. Create Tools on Vapi AI
Go to the Tools section in Vapi AI.
Click on Create New Tool to define functionalities for your assistant.
For appointment settings, you’ll need at least two tools:
Tool One
Name: bookCalendar
Description: Use this function to book an appointment into our calendar.
Property name: requestedTime
Property key: the chosen time of the user in this format: 2024–08–13T11:00:00(This format is known as the ISO 8601 standard used in programming and api keys)
Tool Two
Name: checkCalendar
Description: Use this function to check the availabilities in our calendar
Property name: requestedTime
Property key: the requested booking time of the user in this format: 2024–08–13T11:00:00
Steps for Creating Tools in Vapi AI:
1. Complete the Setup in Make.com
After creating the scenario in make.com:
Click on the Save button at the bottom to save the scenario.
Click on the first module in the scenario (Webhooks).
2. In the Webhooks settings
Webhooks are the first one in our make.com scenario, click on it.
Click Add, give the webhook a name (e.g., “Vapi Appointment Setter”).
Leave the IP Restrictions blank and click Save.
Once saved, a Webhook URL will be generated.
Click Copy Address to Clipboard to copy the URL.
3. Create the First Tool in WAPI.AI
Go to the Tools section in WAPI.AI and click Create New Tool.
Choose Custom Tool and proceed:
Server URL: Paste the webhook URL copied from make.com.
Save it Click Next to move forward.
Tool Properties: Define the properties for the tool( those which I mentioned above for the first tool)
Click Save to save the properties.
Tool Name and Description: Add the tool name and description provided above.
4. Save the tool
Create the second tool using the same exact steps, but use the details mentioned above for second tool.
5. Go to the Functions Tab
Navigate to the Functions section in Vapi AI.
Look for the Tools option within the Functions tab.
Click on it to view the tools you’ve created.
6. Select the Tools
Checkmark the two tools you’ve created:
checkCalendar
bookCalendar
Ensure both tools are selected to connect them to your assistant.
Update the Advanced Settings
Go to Advanced Settings of our assistant within Vapi AI.
Look for the Server URL option (do not confuse this with the Server URL Secret).
Paste the Webhook URL you copied from make.com into the Server URL field.
This ensures your Vapi AI assistant communicates with make.com for automation.
Publish the Assistant
Once all configurations are complete, click the Publish button to finalize the setup.
Run the Scenario on Make.com
After setting up the scenario, click the Run Once button in Make.com.
This allows the scenario to run in test mode, so the system is ready to process the input.
Interact with the System
Once your Vapi AI assistant is published, click on Talk with the assistant in Vapi AI.
Test it by saying something like:
“I want to book an appointment. Is 3 a.m. free?”The system will check the calendar and respond (e.g., “Yes, 3 a.m. is available”) and schedule the appointment.
Verify Data in the Iterator
While the scenario is running, go to the Iterator module in Make.com (it comes after Google Calendar in your scenario).
The iterator will display generated values such as:
calendars: your_email@gmail.com : busy []
Select it and save the scenario.
Ensure these values match your setup and confirm the logic is correctly applied.
Set Up a Phone Number
You need to use a phone number for calls, you can:
Purchase one from Twilio.
Alternatively, acquire one through Vapi AI.
Connect the number to your system to handle communication seamlessly.
Finish and Troubleshoot
If everything works as expected, your appointment setter is fully functional.
If you face issues at any step, leave a comment or reach out, and I’ll be happy to assist further.
That’s it for today. This concludes the guide on building an AI-powered appointment setter using Make.com, Vapi AI, and OpenAI.
I'm sending all the positive vibes your way! 🌟
👍 Goodbye!
Aiza :)